


How to transfer esim to new phone
May 5, 2025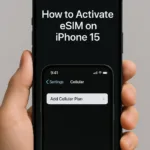
How to activate esim on iphone 15
May 5, 2025
Receiving a new phone is one of life’s small pleasures—unboxing it, holding that slim design in your hand, and discovering all the new bells and whistles. But before you can properly enjoy your shiny new phone, you have to get your cellular service up and running. If you have an eSIM on your phone, you may be thinking about how to move an eSIM to a new phone. Since eSIMs are not physical like standard SIM cards, the process will be slightly different but not necessarily more difficult. In this all-encompassing guide, we’ll guide you through all the steps on how to move an eSIM to a new phone in a human way that is accessible, friendly, and easy to use.
This article is designed to be your go-to resource for transferring an eSIM, whether you’re upgrading to the latest iPhone, Samsung Galaxy, Google Pixel, or any other eSIM-compatible device. We’ll cover everything from the basics of eSIMs to detailed step-by-step instructions, carrier-specific tips, troubleshooting advice, and even international considerations.
Understand eSIMs: The Cornerstone of How to Transfer an eSIM to a New Phone
Before we dive into the nitty-gritty of transferring an eSIM to a new phone, let’s take a moment to see what an eSIM is and why it’s gaining so much popularity. An eSIM, or embedded SIM, is essentially a digital copy of the old physical SIM card. Rather than a small piece of plastic that you put in your phone, an eSIM is integrated right into your device’s hardware. It’s turned on electronically via your carrier so that you can join their network without any swapping at all.
Why is this important to how to transfer an eSIM to a new phone? eSIMs have a number of benefits:
- Space-Saving Design: Since there is no physical SIM tray, manufacturers have room to fit other things into the space, such as larger batteries or thinner phones.
- Flexibility: eSIMs are simpler to change carriers or have multiple plans on a single device, ideal for travelers or work and personal numbers.
- Convenience: It is often possible to activate or transfer an eSIM from home, no need to visit the carrier store.
But once you acquire a new phone, you will have to transfer your eSIM to maintain your phone number, data plan, and service. And that’s where learning how to transfer an eSIM to a new phone would come in useful.
Why Knowing How to Transfer an eSIM to a New Phone Matters
Getting a new phone is fun, but it’s not all about moving your pictures or apps. Your cell phone service is what keeps you tethered to your calls, messages, and internet. Having an idea of how to move an eSIM to a new phone means you’ll be able to get started on your new phone immediately. These are just a few reasons why doing this is so crucial:
- Stay Connected Without Wait: A correct eSIM transfer does not leave you without your phone number or data plan.
- Avoid Carrier Frustration: Knowing the steps can prevent you from having to deal with annoying calls or trips to your carrier.
- Keep Your Phone Number Safe: Properly transferring your eSIM guarantees your number transfers easily to your new phone.
- Save Time and Money: Most eSIM transfers can be completed at home, without needing a professional.
Whether you’re a tech newbie or a seasoned smartphone user, this guide will break down how to transfer an eSIM to a new phone into manageable steps.
Preparing for the Transfer: Setting the Stage for Success
Before you begin the process of how to move an eSIM to a new phone, a bit of preparation is always better. Consider it like going on a trip—you want to have everything in place before you depart. Here’s how to prepare yourself for a seamless eSIM transfer:
Check Your New Phone’s eSIM Compatibility
Not all phones are eSIM-supported, so step one is to ensure your new phone is. Most recent smartphones, such as the iPhone 12 and above, Samsung Galaxy S20 and later, Google Pixel 5 and higher, and so many more, support eSIM. To verify:
Visit the Manufacturer’s Website: Check your phone’s specifications to ensure eSIM support.
Check Settings: In your new phone, go to Settings > Cellular (iPhone) or Settings > Network & Internet > Mobile Network (Android) and check if eSIM options appear.
If your new phone does not support eSIM, you might need a physical SIM card from your carrier. But if it does, you are ready to proceed with how to transfer an eSIM to a new phone.
Verify Carrier Support
Second, make sure your carrier supports eSIM and transfers. The big U.S. carriers such as AT&T, Verizon, T-Mobile, and Google Fi support eSIMs, but smaller or international carriers might not. Check your carrier’s website or call their customer service to find out. Ask if there are any special requirements for transferring an eSIM to a new phone, like a new QR code or account verification.
Back Up Your Old Phone
Before you move anything, back up your previous phone so that your data is safe. This has nothing to do with the eSIM itself, but it’s a good safety precaution in case something happens along the way. Here’s how:
- iPhone: Use iCloud (Settings > Your Name > iCloud > iCloud Backup) or plug in to a computer for an iTunes/Finder backup.
- Android: Use Google Drive (Settings > System > Backup) or your device’s built-in backup function.
With your data safe, you’re ready to tackle how to transfer an eSIM to a new phone.
Step-by-Step Guide: How to Transfer an eSIM to a New Phone
Now, let’s get to the heart of the matter: how to transfer an eSIM to a new phone. The exact steps depend on your device (iPhone or Android) and carrier, but we’ll cover the most common methods below. Follow these steps, and you’ll be connected in no time.
Step 1: Contact Your Carrier (If Required)
Certain carriers must be informed that you’re moving your eSIM to a new device. Your plan might be locked to your previous device’s IMEI (a special identifier). Check by logging into your carrier’s website or app, or by calling their support number. Ask if you require:
- A new eSIM QR code or activation code.
- Approval to move your plan to a new device.
- Any account details, like your PIN or billing information.
For example, T-Mobile and Google Fi often allow transfers through their apps, while Verizon and AT&T may provide a QR code. Knowing your carrier’s process is a key part of how to transfer an eSIM to a new phone.
Step 2: Transfer During Setup (iPhone)
If you’re moving to a new iPhone, Apple has made how to transfer an eSIM to a new phone incredibly user-friendly during the initial setup. Here’s how it works:
- Power On Your New iPhone: Follow the on-screen prompts to set up your language, Wi-Fi, and other basics.
- Reach the Cellular Setup Screen: When prompted to set up cellular, select “Transfer from Nearby iPhone” if your old iPhone is nearby.
- Turn on Bluetooth: Both phones need to be updated to the latest iOS and Bluetooth enabled.
- Verify the Transfer: You could be asked to log in with your Apple ID or type in a verification code you receive on your previous phone.
- Finish the Process: Complete the transfer as instructed. Your carrier can send a confirmatory SMS or email to complete the activation process.
This is done automatically with most U.S. carriers such as T-Mobile, Verizon, and AT&T. If this doesn’t work, don’t worry—we’ll explore manual transfers in the next step.
Step 3: Manual eSIM Transfer (iPhone or Android)
If the automatic transfer doesn’t exist or you have an Android, you can manually transfer your eSIM. Here’s how to manually transfer an eSIM to a new phone:
Obtain a QR Code or Activation Code: Log into your carrier’s website or app to request a new eSIM QR code. Some carriers email it to you, while others display it in their app or portal.
Access eSIM Settings:
- iPhone: Go to Settings > Cellular > Add Cellular Plan.
- Android: Go to Settings > Network & Internet > Mobile Network > Add Carrier.
- Scan or Enter Code: Open your new phone’s camera app and scan the QR code. If you have a manual code, enter it into the space provided.
- Activate the eSIM: Once prompted, activate your eSIM following the on-screen instructions. This may take several minutes while your carrier confirms your plan.
After activating, test your service by calling, texting, or going online. If it fails, check the QR code again or call your carrier for help.
Step 4: Take Out the eSIM from Your Old Phone
After moving your eSIM, take it out of your old phone to avoid conflicts. Here’s how:
- iPhone: Settings > Cellular > Tap the plan > Remove Cellular Plan.
- Android: Settings > Network & Internet > Mobile Network > Tap the plan > Remove.
This will leave your new phone as the sole device on the eSIM, finishing up how to transfer an eSIM to a new phone.
Step 5: Test Your Connection
Test calls, texts, and data with the active eSIM to ensure everything’s working as expected. If things don’t work as expected, try these tips for troubleshooting:
- Restart Your Phone: A quick restart can solve many connectivity issues.
- Update Carrier Settings: On iPhone, open Settings > General > About to ensure carrier updates. On Android, open Settings > System > Software Update.
- Contact Your Carrier: If the eSIM continues to fail, your carrier may have to resend the QR code or update your account.
Carrier-Specific Tips for How to Transfer an eSIM to a New Phone
Each carrier has its own procedures for how to move an eSIM to a different phone. Here’s a close-up look at how the big U.S. carriers do eSIM transfers, and some advice for smaller or international carriers.
T-Mobile
T-Mobile has a very easy-to-use eSIM procedure. To move your eSIM:
- Log in to your T-Mobile account through their website or app.
- Go to “Manage Lines” and ask for a new eSIM QR code.
- Scan the QR code on your new phone to activate.
- If you have an iPhone, T-Mobile enables the automatic “Transfer from Nearby iPhone” feature during setup.
- T-Mobile’s app also allows you to manage multiple lines, so how to transfer an eSIM to a new phone is easy.
Verizon
Verizon takes a little more effort for eSIM transfers:
- Log into your Verizon account online or through the My Verizon app.
- Ask to have an eSIM transferred to your line, which will create a QR code or activation code.
- Scan the QR code with your new phone or enter it manually.
- For iPhone users, Verizon has the automatic transfer capability built into setup.
problems, Verizon’s customer care can be reached by chat or phone to walk you through transferring an eSIM to a new device.
AT&T
AT&T’s procedure is much the same but with a few added steps:
- Log in to your AT&T account and go to your line’s settings.
- Make an eSIM activation request, which will deliver a QR code via email or print it in the portal.
- Scan the QR code on your new device to activate the eSIM.
- If the auto iPhone transfer fails, use the manual QR code transfer process.
- AT&T’s website has a separate eSIM area to assist with how to transfer an eSIM to a different phone.
Google Fi
Google Fi is eSIM-compatible and simplifies transfers:
- Open the Google Fi app or webpage and choose your line.
- Ask for a new eSIM activation code.
- Scan the code on your new device to activate.
Google Fi also has automatic transfer support for qualified devices.
Other Carriers
Smaller or international carriers can have varying requirements for how to move an eSIM to a new phone. For instance:
- Prepaid Carriers: Some, such as Mint Mobile, are eSIM compatible but might want you to come in-store or reach out to support to get a new QR code.
- International Carriers: In the UK (e.g., EE, Vodafone) or Australia (e.g., Telstra), eSIM transfers usually use similar QR code procedures, but consult your carrier for details.
Always go to your carrier’s website or call their support for step-by-step instructions.
Troubleshooting Common Issues with How to Transfer an eSIM to a New Phone
Even with a clear guide on how to transfer an eSIM to a new phone, things don’t always go perfectly. Here are some common challenges and how to fix them:
- QR Code Not Working: Ensure you’re using the correct QR code for your new device. If it’s expired or invalid, request a new one from your carrier.
- Carrier Lock Issues: If your previous phone is locked to a carrier, you might need to unlock it first to transfer the eSIM. Ask your carrier to find out.
- No Service After Transfer: Check that the eSIM is active in your phone’s settings. If it’s still not active, restart your phone or contact your carrier.
- Old Phone Still Active: If your old phone still shows service, remove the eSIM (see Step 4 above) to avoid conflicts.
If you’re stuck, don’t hesitate to reach out to your carrier’s support team—they’re there to help with how to transfer an eSIM to a new phone.
Pro Tips for Mastering How to Transfer an eSIM to a New Phone
In order to make transferring an eSIM to a new phone as hassle-free as possible, remember these pro tips:
- Keep Devices Updated: Make sure both your existing and new phones are on the most recent software in order to prevent compatibility problems.
- Account Have Info Ready: Your carrier account PIN, telephone number, or billing information may be required for the transfer.
- Transfer Within Business Hours: when carrier assistance need, perform the transfer during their business hours.
- Test Soon After: Following transfer, test your service soon thereafter to detect possible issues in good time.
- Save the QR Code: In the event that your carrier provides a QR code, screen shot or print it so it can be accessible if required afterward.
How to Transfer an eSIM to a New Phone Internationally
If you’re moving to a new country or traveling, how to transfer an eSIM to a new phone can be more complex due to varying carrier policies. Here’s how to handle it:
- Research Local Carrier Support: Confirm that your new country’s carrier supports eSIM and is compatible with your phone model.
- Request a New eSIM: Contact your international carrier for a new eSIM QR code or activation code.
- Consider Temporary eSIM Plans: If your home carrier does not support international transfers, use options such as Airalo, Nomad, or Holafly for temporary eSIM plans.
- Check Roaming Options: There are carriers that enable you to maintain your home eSIM for roaming, although this can prove costly.
Research your destination’s eSIM needs before traveling so that the process of transferring an eSIM to a new phone is seamless.
The Future of eSIMs: What’s Next for How to Transfer an eSIM to a New Phone
eSIM technology continues to develop, and transferring an eSIM to a new phone is only going to get simpler in the future. Some trends to look out for:
- Universal eSIM Platforms: Industry associations are developing standards to enable eSIMs to work perfectly across carriers and devices.
- Automatic Transfers: More producers will implement Apple’s automatic transfer feature, so QR codes are less necessary.
- Wider doption: The standard, eSIMs will be supported by even low-budget phones and minor carriers.
Being ahead of the curve in today’s digital world, for the time being, learning how to transfer an eSIM to another phone places you there.
FAQs About How to Transfer an eSIM to a New Phone
1.Can I transfer an eSIM without calling my carrier?
Yes, in some instances, particularly with iPhone’s automatic transfer feature. Yet, most carriers need a new QR code or activation code.
2.Will my phone number be different after transferring an eSIM?
No, your phone number remains the same provided you transfer the eSIM to the same carrier account.
3.How long does it take to transfer an eSIM?
The majority of transfers will complete in 5–15 minutes, but this may take a bit longer if your carrier needs to authenticate your account.
4.Can I transfer an eSIM to a non-eSIM supported phone?
No, your new device has to support eSIM. If not, you’ll be able to get a physical SIM card from your carrier.
5.What happens if I lose my QR code?
Contact your carrier to request a new QR code or activation code for how to transfer an eSIM to a new phone.
Conclusion: You’re Ready to Transfer Your eSIM!
Congratulations—you now know how to move an eSIM to a new phone like a pro! Whether you’re upgrading to a new iPhone, Android, or other eSIM-enabled device, this tutorial has armed you with the information to transfer your mobile plan effortlessly. From ensuring compatibility to fixing problems, you’re ready to navigate every aspect of the process.
Next time you’re unpacking a fresh new phone, don’t let the eSIM transfer process get you worked up. Just use this guide, contact your carrier if necessary, and get to enjoy your new phone with no interruption of service. Bookmark this page for later reference, and pass it along to friends who can use assistance on transferring an eSIM to a new phone. Upgrade away!


2 Comments
Your article helped me a lot, is there any more related content? Thanks!
Thank you for your feedback, you can check out our other blogs, in the blogs section of the main page. 🙂